

 NDA Application Form 2018 has been released from 6th June 2018. National Defence Academy (NDA Exam) is the national level examination. This exam is conducted two times within a period of one year. NDA Exam is managed by the Union Public Service Commission (UPSC). This examination is conducted for the recruitment in Indian Defence Forces which include Indian Army, Air Force and Navy. Here, we have mentioned the detailed information about How to Fill NDA 2018 Application Form.
NDA Application Form 2018 – Released
NDA (I) 2018 Application Form can be filled till 5th February 2018 (6:00 PM). Check here for application details.
NDA (II) application form has been released on 6th June 2018. Candidates can fill the form till 2nd July 2018. It is very important to fill the form accurately otherwise, it will lead to the rejection of the NDA application form 2018. No application will be provided through offline mode. There will be no need to send the application through email or by post. Save the print copy of the application for future use.
How to Fill NDA 2018 Application Form
Follow these steps for filling the NDA application form:
Step 1- Apply online on Official Website.
Step 2- Fill the Application Form followed by Part-1 and Part-2 registration.
Step 3- Read Declaration and Click on Agree.
Step 2- Fill the Application Form followed by Part-1 and Part-2 registration.
Step 3- Read Declaration and Click on Agree.
Step- 1: Apply online
- Visit the official website (link is given above).
- Click on the”Online application for various examinations of UPSC”.

- On the top right-hand side of the webpage, there are two links namely: “PART-I Registration” and “PART-II Registration”.
- Click on Part – 1 Registration.

Step- 2: Fill the Application Form
PART-I Registration:
- As you click on the link of “Part-1 Registration”, a new webpage will appears on the screen. Here, Important Instructions to fill Online Application Form is given.
- Read the instructions carefully and click on ‘Yes’ button available on the bottom of the screen.
- Clicking on ‘Yes’ button takes you to the application form.
- Part-1 registration is divided broadly into four pages.

Page- 1: Candidate’s Details (Registration)
Enter your Personal Details
- In this page, the system asks for the candidate’s personal details.
- Enter your Name, DOB, Father’s name, Mother’s name, Aadhaar Number (if available), Nationality, Fee Remission Allowed , Community, minority, marital status, etc.
Enter your Qualification Details:
From here select your qualification details. There are four options indicated by the drop down menu.
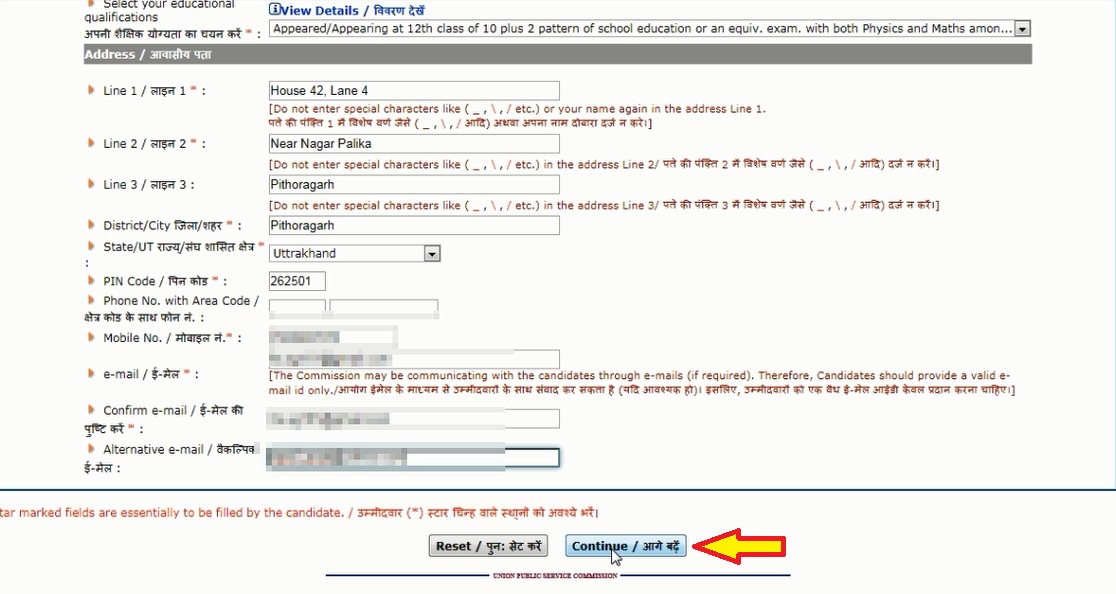
Address:
- Enter your complete address in the prescribed fields.
- Email id must be valid and also enter your personal contact number or the phone number of your parents.
- After feeding all the details, click on ‘Continue’ button.
Note: The candidates belong to SC/ST need not to pay the application fee against NDA application form. Those who are the sons of ex-serviceman/ JCO/NCO and Other Ranks of the Army are also not required to pay any fee for the application form. If such candidates are currently pursuing their studies form Sainik or military school then they are required to produce the certificate of eligibility duly signed by the principals at the time of SSB interview.
- The candidates claimed for the fee exemption have to click on “YES” response in the Fee Exemption claimed Field. Such candidates are not taken to the payment page.
Page- 2: Choosing the Branch Preferences
- In this page, the aspirants have to choose the preferences for Indian Army, Air Force and Navy.
- Mark the preferences in numbers from 1 to 4.
- Mark ‘0’ in that field for which candidates don’t want to give any preference.
- This page also asks the information about Whether Student of Sanik/Military School or Son of JCO/NCO/Other Rank Officer?
- Mark your response in Yes or No.
- Click on “Continue” button for moving to the fourth page.

Page- 3: Verify Your Details
- In this page, the candidates can update their details by clicking on ‘Update’ button.
- Verify your details properly as no correction will be allowed after the submission of application form. At last Mark I agree/I do not agree.

Page- 4: Generation of Registration ID
- At this page, the candidates are able to view the system generated ‘Registration ID’. This page also shows candidate’s other details like name, father’s name, DOB, email id, etc.
- Now, the “Part- 1 Registration” of NDA application form has been completed. The email regarding this will be sent to the candidate’s provided mail id. Now login for the “Part – II registration“

Note: Don’t forget to take the printout of this page. Click on “Print” option available there. Also, note down the registration id and DOB as it is required in further stages.
PART-II Registration:
It involves four steps:
- Fee Payment.
- Filling the Choice for Examination Centre.
- Uploading of Photograph.
- Uploading of Signature.
 Fee Payment:
- The payment can be done through cash/credit card/debit card or net banking.
- Pay the application fee via cash deposited to any branch of the SBI bank.
- The candidates can also use the credit card/debit card of any bank for the fee payment.
- The payment through internet banking will be done using the internet banking facility of State Bank of India/State Bank of Bikaner & Jaipur/State Bank of Hyderabad/State Bank of Mysore/State Bank of Patiala/State Bank of Travancore.

- After the successful payment of application fee, an SMS alert will be sent to the candidates. The candidates who are exempted to pay the application will receive the SMS alert after uploading of the images.

Filling the Choices for Examination Centres:
- Choose the appropriate examination centre as per your suitability.
- Candidates can choose any one examination centre.

Uploading of Photograph:
This step provides you the space for uploading the image of photograph. Read carefully all the instructions before go through the upload steps:
- The size of the photograph must be less than 40 kb and greater than 3 kb.
- The image of photograph must be in .jpg format.
- 140 pixels height x 110 pixels width is required for photograph.
- Bit Depth of image file should be 24 bit.
Uploading of Signature:
- Put your signature with a black ink pen on white background.
- Image of signature must be the .jpg format.
- The pixel size of the signature should be 110 pixels height x 140 pixels width.
- The file size of the signature must be less than 40 kb and greater than 1 kb.
- Bit Depth of image file should be 24 bit.

Note: The image preview will be generated after uploading. Here, the candidates can recheck his/her uploaded images.
- If satisfied with the uploaded image then, click on “Confirm Upload” button, otherwise click the “Reload Photograph/Reload Signature” button.
Step- 3: Read Declaration and Click on Agree
The application form will be completed after the submission of Part- 2 Registration. Click on ‘I have read Declaration & Agree’ button for the final submission of NDA online form.
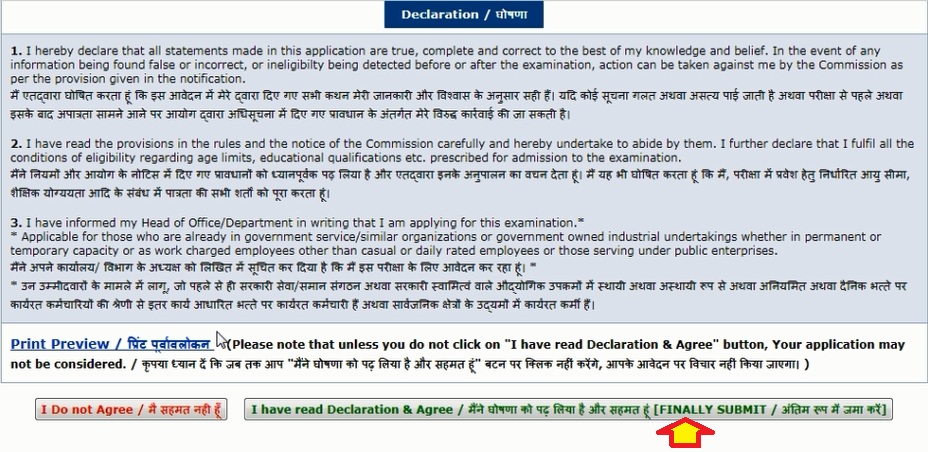
- Now you can print the application form.

Key Features
- The applicants submitted their form through online mode is not needed to send any document/certificate to the UPSC.
- The message of final submission of the application form will be received by the candidates via e-mail.
- “View/Print Application” link is available on the home page for viewing the submitted application form.
For any further assistance regarding How to Fill NDA 2018 Application Form, you may ask us by commenting below.
 #ref-menu
0 Comments
THANKS FOR YOUR C O M M E N T